Arxys Video X v3 Enterprise
Quick Installation Guide
- Unpack the components
Carefully remove the VideoX v3 Enterprise Appliance from its shipping box. The VideoX v3 Enterprise Appliance is shipped without its hard drives installed. Operating system SSDs or database SSDs are shipped installed.
- Install the Rackmount Kit on the Chassis
A rackmount rail kit is included with VideoX v3 Enterprise Appliance. Refer to the documentation shipped inside the rackmount rail kit box.
- width
800
- alt
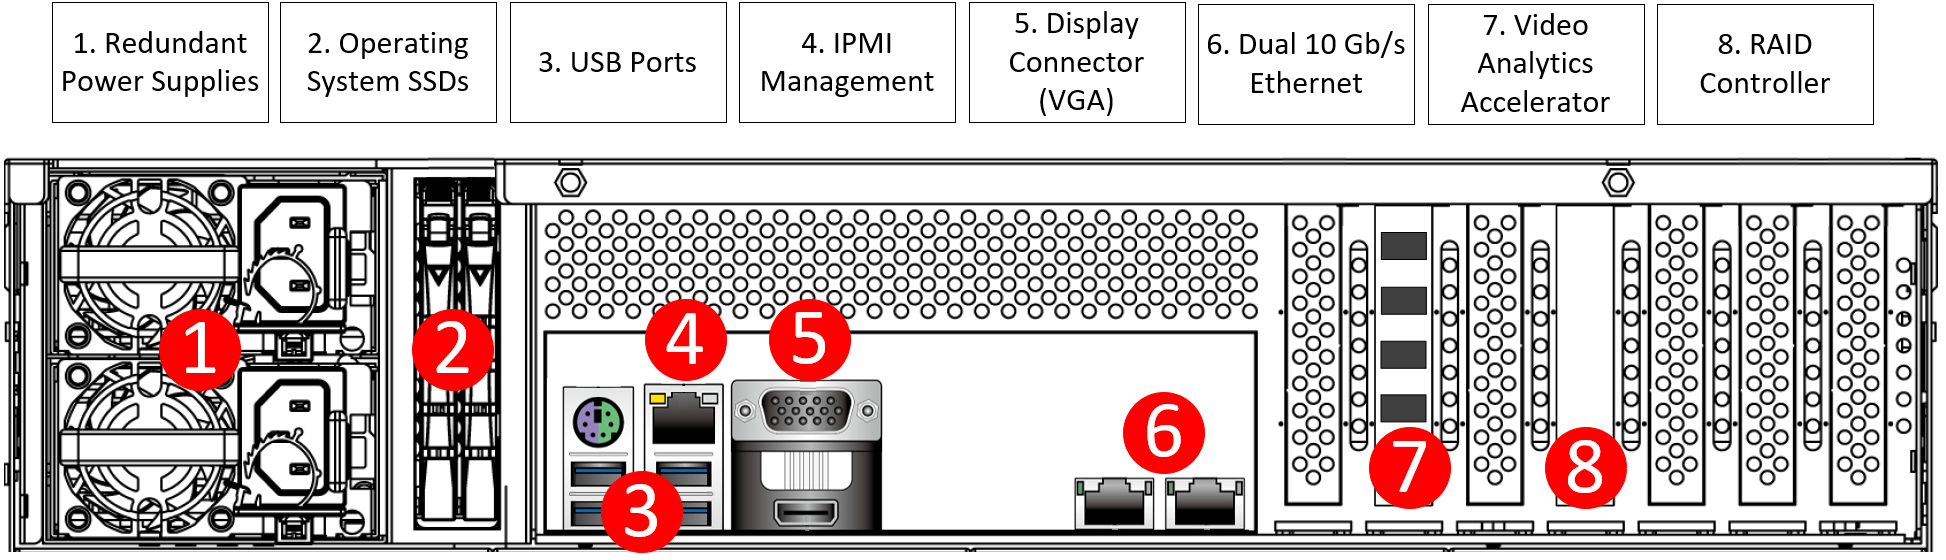
VideoXv3EntBack
- Cabling VideoX v3 Enterprise
The VideoX v3 Enterprise Appliance requires two 110-240 VAC power sources. Connect both power cords (1). Connect a display to the VGA port (5). Connect a keyboard and mouse to any available USB port (3). Plug in at least one ethernet cable into an ethernet port of the VideoX v3 Enterprise (6). A network cable should also be connected to the management (BMC/IPMI) port for later usage (4).
- Install Hard Disk Drives
Before powering on the VideoX v3 Enterprise Appliance install the hard disk drives shipped into the chassis. Each hard disk drive/tray that was received should be inserted into the chassis. Verify that the serial number marked on each hard disk drive/tray match the serial number of the VideoX v3 Enterprise Appliance. Install the hard disk drives into the empty hard disk slots of the VideoX V3 Enterprise Appliance in any order. Make sure to press the drive carrier handle closed until it clicks in place and that the drive trays all sit flush with the chassis.
- Power on the server
To turn on the VideoX v3 Enterprise Appliance, press the power button located on the front-left of the VideoX V3 Enterprise. The system will power on. During this time, the hard drive activity LEDs on the VideoX v3 Enterprise Appliance will blink. Allow the VideoX v3 Enterprise Appliance to boot into the Windows® 2019 Server operating system.
- Windows® Operating System Setup
- Once the VideoX V3 Enterprise completely boots, follow the onscreen instructions to complete the license and activation of Windows® 2019 Server
Select the correct country/region, time and currency, and keyboard layout that are appropriate. Click Next to continue
Type in the product key found on the Microsoft® COA label located on the front left corner of the appliance. Scratch off the protective/privacy silver coating to reveal the entire product key. Click Next.
Review and accept the Microsoft® Software License Terms and click Accept.
Follow the instructions to set the administrative password for the appliance. Please note that the appliance ships without an administrative password. The password set here will create the only set of credentials that can be used to log into the appliance. Arxys is unable to reset this account.
- Logging into the VideoX V3 Enterprise Appliance
Follow the onscreen instructions to log in using the password set in step 6.4
- Installation of Video Management Software
The VideoX V3 Enterprise Appliance can be shipped with various video management platform packages. If a specific VMS package was requested with the purchase of the appliance, the platform installation package will auto run when the system is first used. The platform installation packages will be located in the folder located at C:ArxysSupportVMS. For additional information on installing, licensing, and configuring VMS see the VMS documentation.
- Windows® Operating System Updates and Patches
The VideoX V3 Enterprise Appliance ships with the Windows® Server 2019 operating system. Microsoft® routinely release updates and patches to improve stability and security. Any updates released after the VideoX V3 Enterprise has shipped will need to be applied. Consult with you system administrator to verify the best way to install these updates.